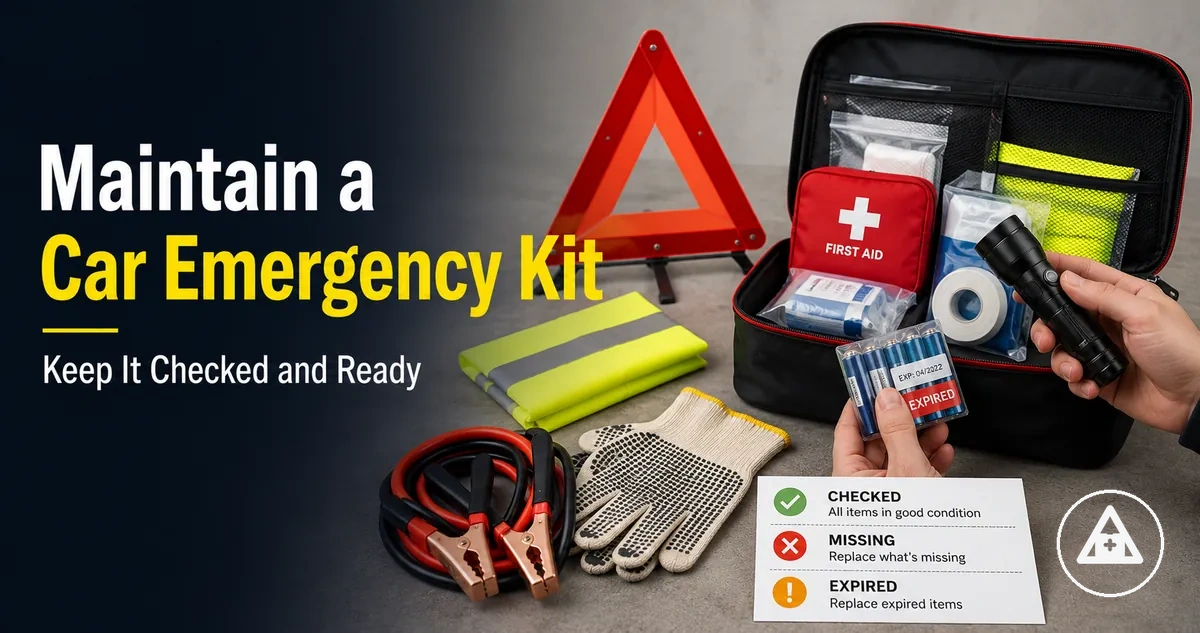
Car Emergency Kit Maintenance for Roadside Readiness
Car emergency kit maintenance means keeping emergency supplies usable, complete, and easy to reach before a roadside problem occurs. A ready kit supports safe use when expiry checks, replacement timing, and missing supplies are controlled for roadside readiness.
Expiry checks help identify first aid supplies, food, water, and other items that may need replacement based on labels, packaging, storage conditions, or previous use. Missing supplies can leave the vehicle emergency kit incomplete after a trip, refill, or roadside event. Batteries also need attention because a flashlight or powered item may become unreliable if charge, corrosion, or fit is not checked. Heat, moisture, and poor access can further reduce kit readiness, depending on how the roadside kit is stored.
This maintenance page fits within the broader car emergency kit guide by focusing on how to keep an existing kit ready after it has already been assembled or chosen.
The goal is not to select every item again. The goal is to inspect the current car emergency kit, replace what has expired, restore what is missing, and keep emergency supplies accessible for safer roadside use.
What Car Emergency Kit Maintenance Covers
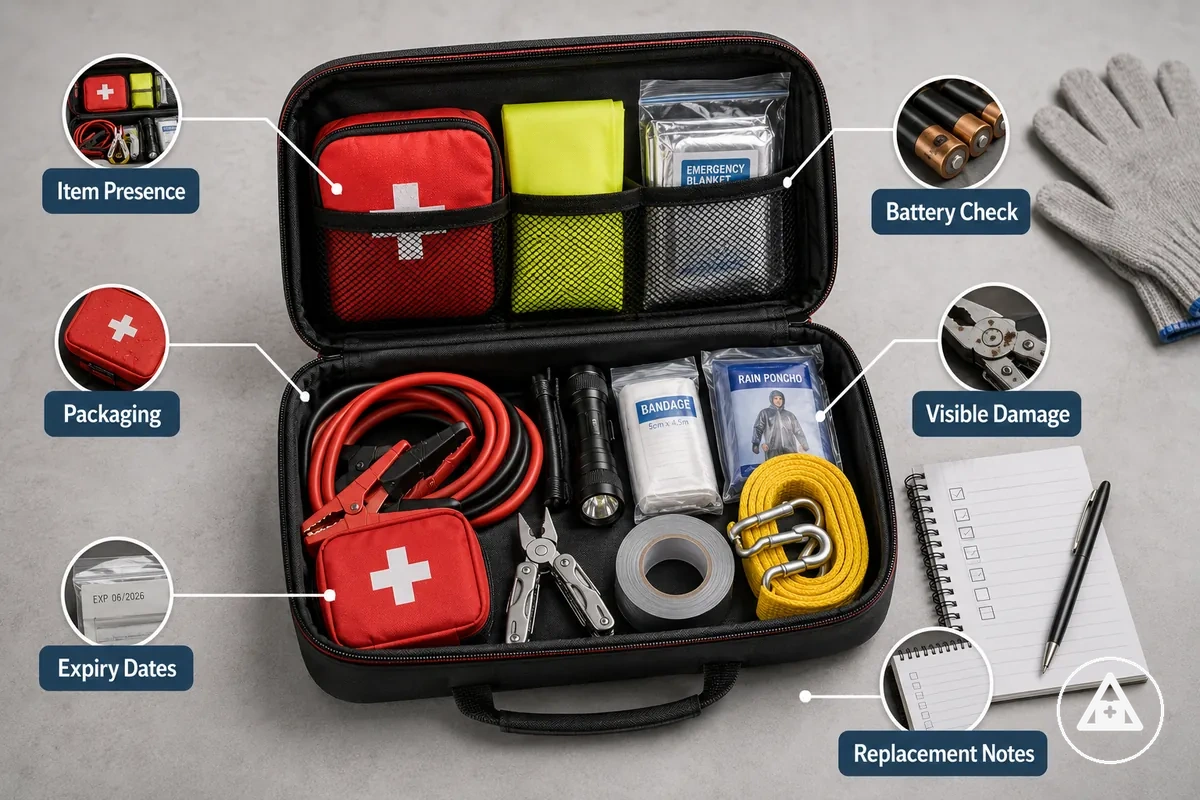
Car emergency kit maintenance covers keeping an existing kit ready through inspection of condition, completeness, accessibility, and expiry risk. It focuses on kit upkeep rather than choosing new supplies. The four maintenance dimensions are condition, completeness, accessibility, and expiry risk.
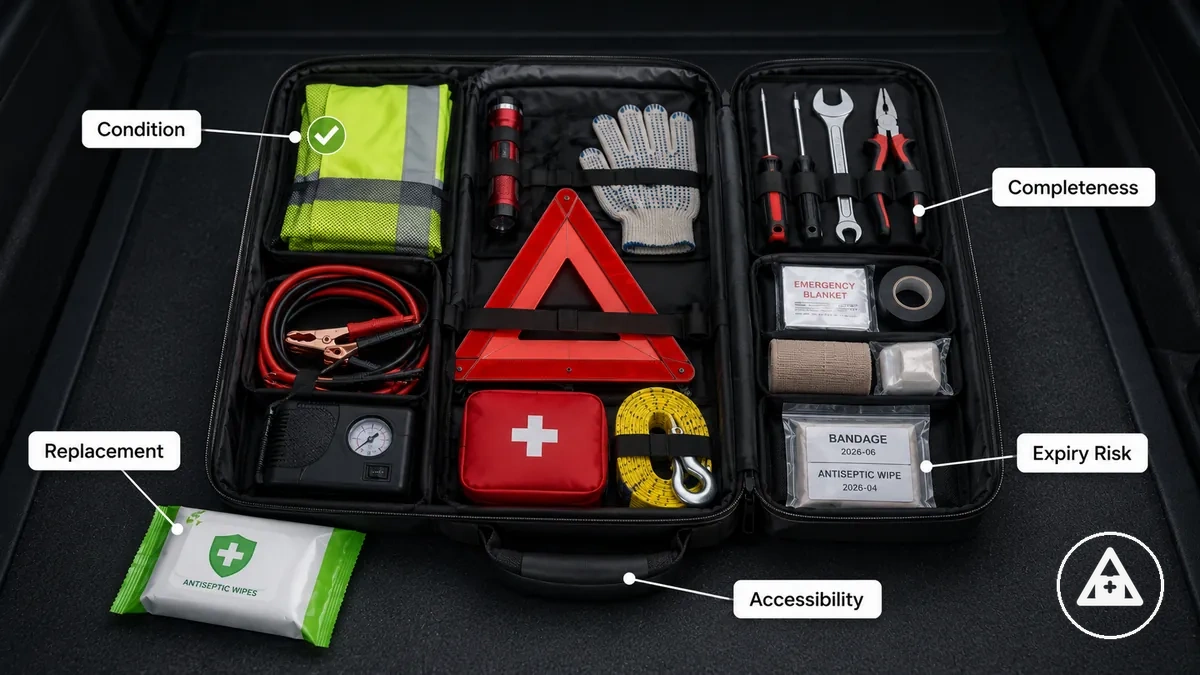
Car emergency kit maintenance includes checking whether items remain usable, whether missing items should be restored, whether batteries or dated supplies need attention, and whether the kit remains easy to access. A maintenance check may involve reviewing labels, packaging, power sources, and visible wear that could affect readiness. These inspections help keep the existing kit ready without expanding into full contents selection. For a detailed look at kit contents to inspect, see the dedicated contents page.
- Condition of emergency supplies and signs of damage or deterioration.
- Missing items that may need to be restored to maintain completeness.
- Expiry risk from dated supplies or batteries that may require replacement.
- Accessibility so the kit remains easy to locate and reach.
- Replacement notes based on inspection findings, previous use, or item condition.
This scope focuses on maintaining an existing kit rather than choosing a new one. Detailed storage, seasonal, and item-selection guidance belongs to separate maintenance topics.
How Often to Check and Refresh a Car Emergency Kit
A car emergency kit should be checked on a routine schedule and again before higher-risk driving situations. Regular inspection helps maintain readiness, while trigger-based checks help identify issues that may develop between routine reviews. The most effective approach combines a routine schedule with condition-based refresh timing.
How Often to Check and Refresh a Car Emergency Kit depends on both timing and circumstances. The image below clarifies common timing triggers that can affect readiness, including routine checks, pre-trip reviews, expiry cues, and battery test cues.
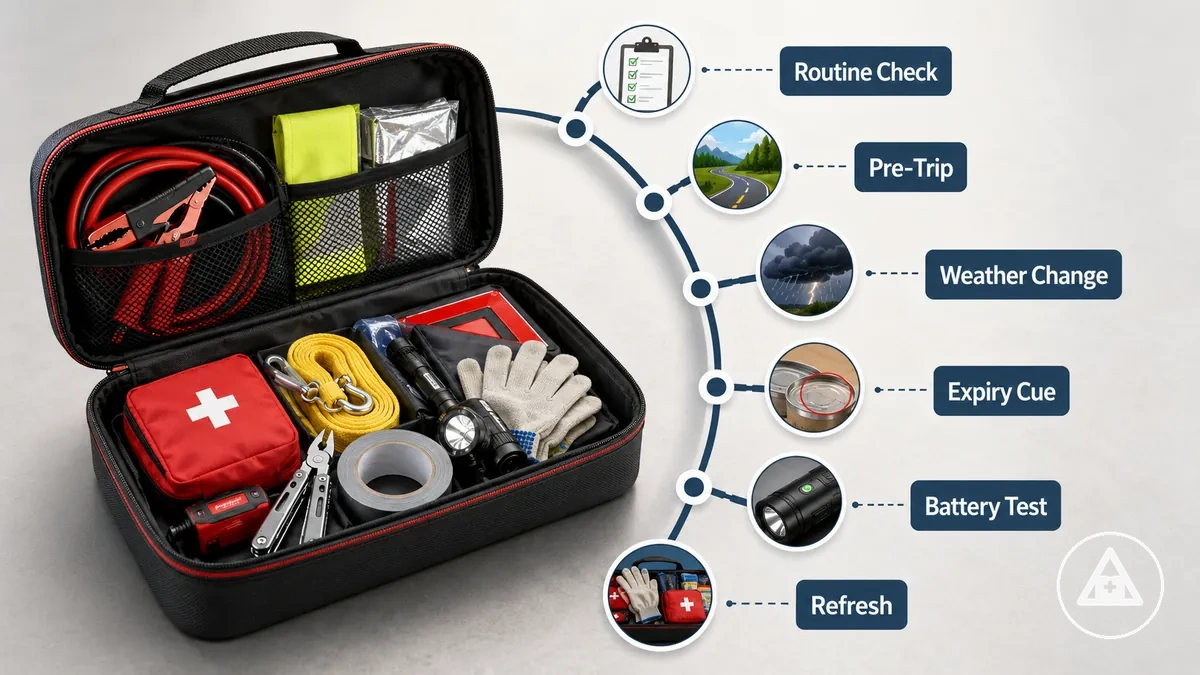
Higher-risk driving situations, such as before long trips or after weather changes, can justify an additional readiness check even when a recent inspection has been completed. First aid supplies may require review of dates and packaging condition, while batteries may need a charge, corrosion, or function check. Refresh timing depends on item labels, storage conditions, previous use, and visible condition. When a replacement trigger appears, the goal is to restore readiness rather than rely on a fixed expiry assumption.
| Check timing | What to inspect | Why it matters | Action cue |
|---|---|---|---|
| Routine schedule | General kit condition, expired items, completeness | Supports ongoing readiness | Confirm condition or refresh items when needed |
| Before long trips | Critical supplies, batteries, accessibility | Higher-risk driving may increase reliance on the kit | Inspect and confirm readiness before departure |
| Weather changes | Items affected by storage or environmental conditions | Condition may change after exposure to different conditions | Check for deterioration or a replacement trigger |
| Post-use checks | Used, missing, or damaged items | Completeness may be reduced after an incident | Restore or replace affected supplies |
Check frequency should remain conditional rather than fixed. Inspection interval and refresh decisions are best guided by item labels, storage conditions, and observed condition when those factors provide more specific direction.
Routine six-month checks
A six-month check helps confirm that a car emergency kit remains complete and usable. This routine check focuses on condition, presence, and basic function rather than adding new supplies. The purpose of the six-month check is to verify that key items remain ready for use.
The six-month check verifies whether important items still meet basic readiness criteria. Use the following mini-checklist during a twice-yearly inspection:
- Confirm that expected items are present and the kit remains complete.
- Check packaging condition for signs of wear, leaks, or deterioration.
- Review expiry dates on items that display date-based information.
- Test battery function and check for signs of charge loss or corrosion.
- Inspect for visible damage that could affect usability.
- Make notes for replacement when an item is missing, damaged, expired, or no longer usable.
If the six-month check identifies gaps in completeness, use the checklist for missing items as a criteria reference before deciding which items require attention.
Checks before long trips or weather changes
Long trips, remote routes, and weather changes can increase readiness risk between routine inspections. A pre-trip check helps confirm that a car emergency kit remains usable when driving conditions may place additional demands on supplies. These checks are most relevant when travel plans or environmental conditions create a trigger condition.
A quick readiness check can focus on the conditions most likely to affect kit usability:
- Long trips: Confirm that essential items are present and accessible because extended travel may increase reliance on the kit.
- Remote routes: Check kit completeness and battery-powered items because replacement options may be less accessible during the journey.
- Heat: Inspect items with temperature sensitivity and review packaging condition for signs of deterioration.
- Cold: Check battery function and item condition because low temperatures may affect usability.
- Rain or moisture: Look for packaging damage, dampness, or exposure that could affect stored supplies.
- Seasonal change: Review whether changing driving conditions create a need for a weather-triggered check before travel.
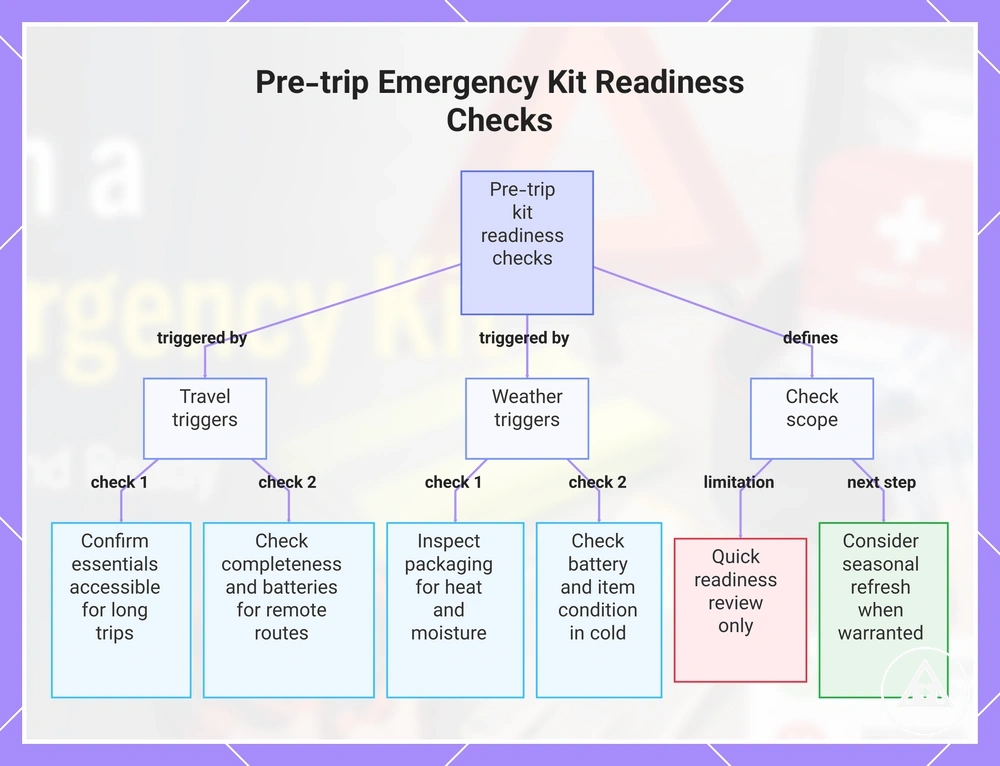
A pre-trip check is intended as a quick readiness review rather than a complete refresh of the entire kit. When broader environmental conditions suggest a more comprehensive review, consider a seasonal kit refresh. If cold-weather preparation becomes the primary concern, see the dedicated guidance for winter kit checks.
This chart shows the trigger conditions that call for a pre-trip car emergency kit check, the specific checks to perform, and the scope of the check as a quick readiness review.
Car Emergency Kit Items That Expire or Lose Reliability
Some car emergency kit items become unreliable because they expire, discharge, degrade, leak, break, or go missing after use. Reliability can change even when an item remains stored in the kit. The key maintenance concern is identifying reliability risks before they affect readiness.
The table below organizes common item groups by reliability risk, inspection cue, and replacement trigger. For a broader view of kit contents to inspect, use item type as a maintenance criterion rather than treating the list as a complete inventory.
| Item group | Reliability risk | What to inspect | Replacement cue |
|---|---|---|---|
| Consumables | Expired items, degradation, contamination | Date markings, packaging condition, visible deterioration | Expiry, damage, leakage, or loss of usability |
| Sterile first aid items | Loss of sterility, seal failure | Expiry dates, seal integrity, packaging condition | Broken seals, expired dates, or compromised packaging |
| Powered items | Discharge, corrosion, electrical failure | Battery condition, battery function, signs of corrosion | Weak function, discharge, leakage, or corrosion |
| Durable roadside gear | Wear, damage, breakage, missing after use | Visible condition, physical damage, accessibility | Breakage, missing components, or loss of usability |
Inspection cues help identify when an item may lose reliability without requiring a full inventory review. When a visible condition matches a replacement trigger, the item can be refreshed, restored, or replaced as needed. This approach keeps maintenance focused on readiness signals rather than item-by-item inventory checks.
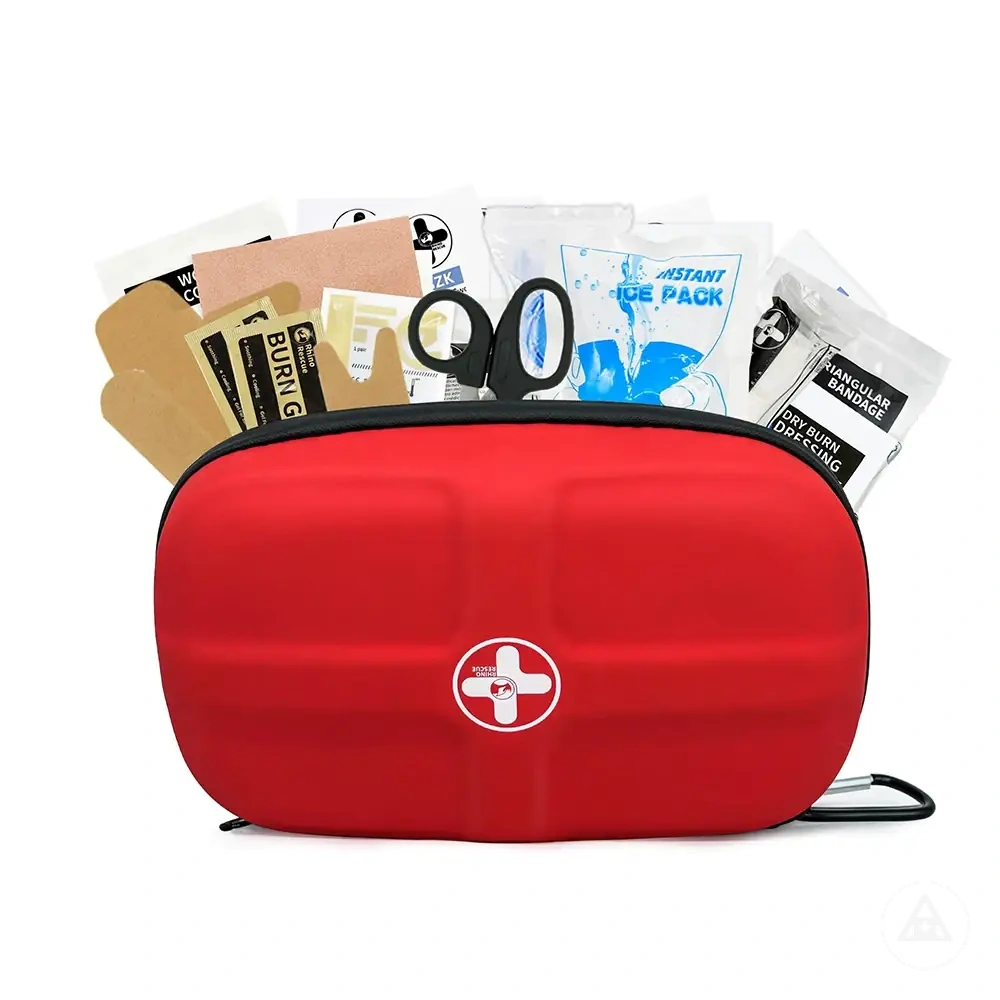
First aid supplies and sterile items
First aid supplies and sterile items can lose reliability when packaging is expired, opened, contaminated, or already used. A maintenance check should identify items that may need replacement before they are relied on. The main cues are expiry and seal integrity.
First aid inspection helps prevent damaged, opened, or missing medical consumables from staying unnoticed in the kit. Check these items with packaging instructions, previous use, and local safety requirements in mind:
- Check expiry on bandages, antiseptic items, and other dated supplies, then replace items when the date or packaging guidance indicates they should not stay in the kit.
- Inspect seal integrity on sterile items and discard supplies when seals are broken, loose, or visibly compromised.
- Look for contamination signs such as moisture, staining, dirt, or damaged wrapping, and replace affected items rather than keeping them with usable supplies.
- Confirm that gloves and other consumables are still present in usable quantities, and refill missing quantities when previous use has reduced the kit.
- Review packaging condition for crushing, tearing, leaks, or unreadable labels that may make safe maintenance decisions less clear.
Food, water, and consumable supplies
Food, water, and consumable supplies can lose usefulness when dates are overlooked, packaging is damaged, or storage conditions affect the contents. Regular inspection helps identify items that may need attention before they become unusable. The key maintenance checks focus on packaging and temperature exposure.
Consumable inspection helps prevent spoiled, leaking, or compromised stored supplies from remaining in the kit. If vehicle heat has affected packaging or container condition, earlier replacement may be appropriate even when the expiry date has not yet been reached.
- Check the expiry date on food, emergency water, and other consumables, and use the date as a primary inspection point.
- Inspect seals and packaging for signs of opening, punctures, swelling, or visible damage that could affect stored supplies.
- Review container condition for cracks, deformation, or wear that may increase leakage risk.
- Look for leakage around containers, packaging, or storage areas, especially when items have been exposed to changing temperatures.
- Check for unusual odour when packaging condition suggests possible deterioration or contamination.
- Use a replacement trigger when expiry date, leakage, packaging damage, or heat exposure creates doubt about the condition of the consumable supplies.
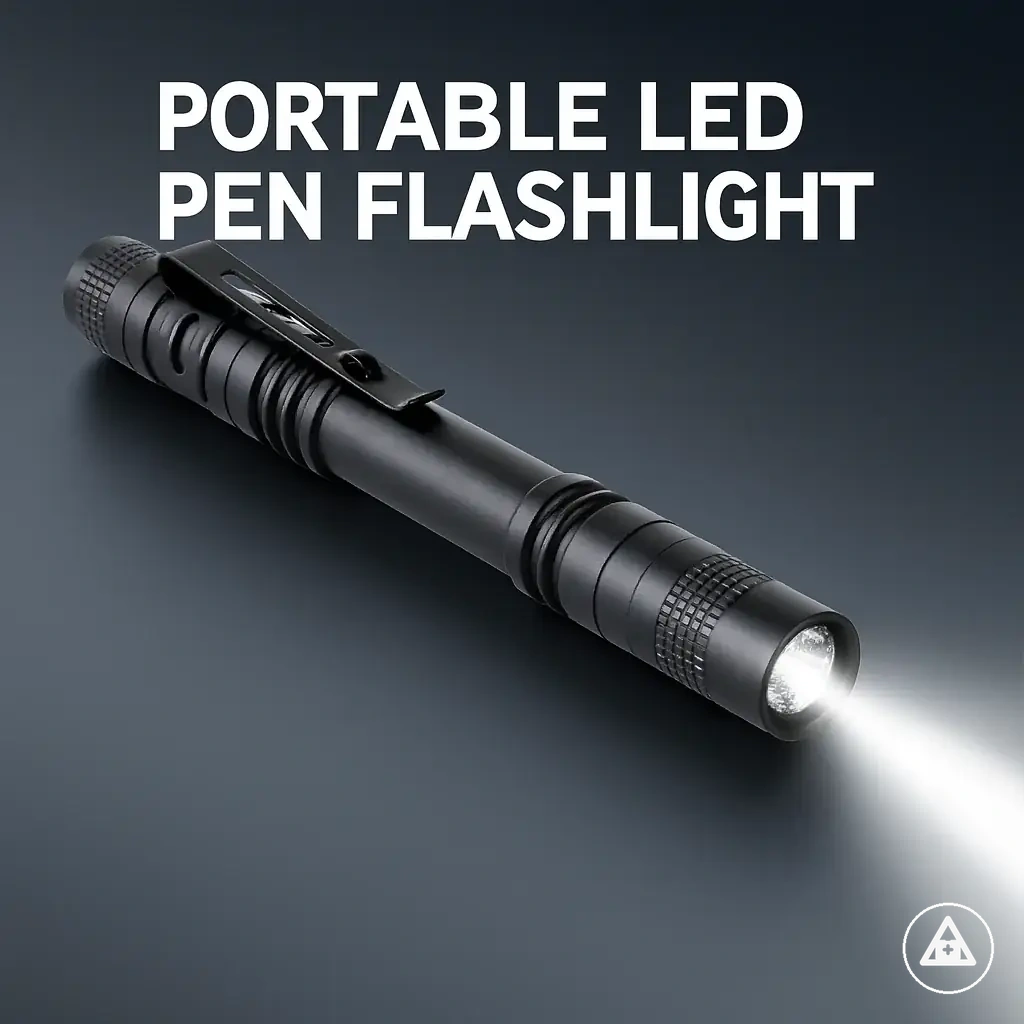
Flashlights, batteries, and powered items
Flashlights, batteries, and powered items can become unreliable when batteries discharge, develop corrosion, or no longer fit the device correctly. A maintenance check helps identify these issues before the item is needed. The main concern is silent failure risk.
Powered items need a function test to confirm that lighting items and other battery-powered gear remain ready. Use the checklist below to inspect function and battery condition:
- Perform a flashlight function test by turning the item on and confirming that it operates as expected.
- Check that spare batteries match the required battery type and still fit the device correctly.
- Inspect batteries and battery compartments for corrosion or leakage, as these conditions can make powered items unreliable; replace affected batteries rather than attempting to reuse them.
- Review charging status on rechargeable powered items and recharge when stored charge may no longer be adequate.
- Check storage packaging for spare batteries and other powered items to identify damage, moisture exposure, or missing components.
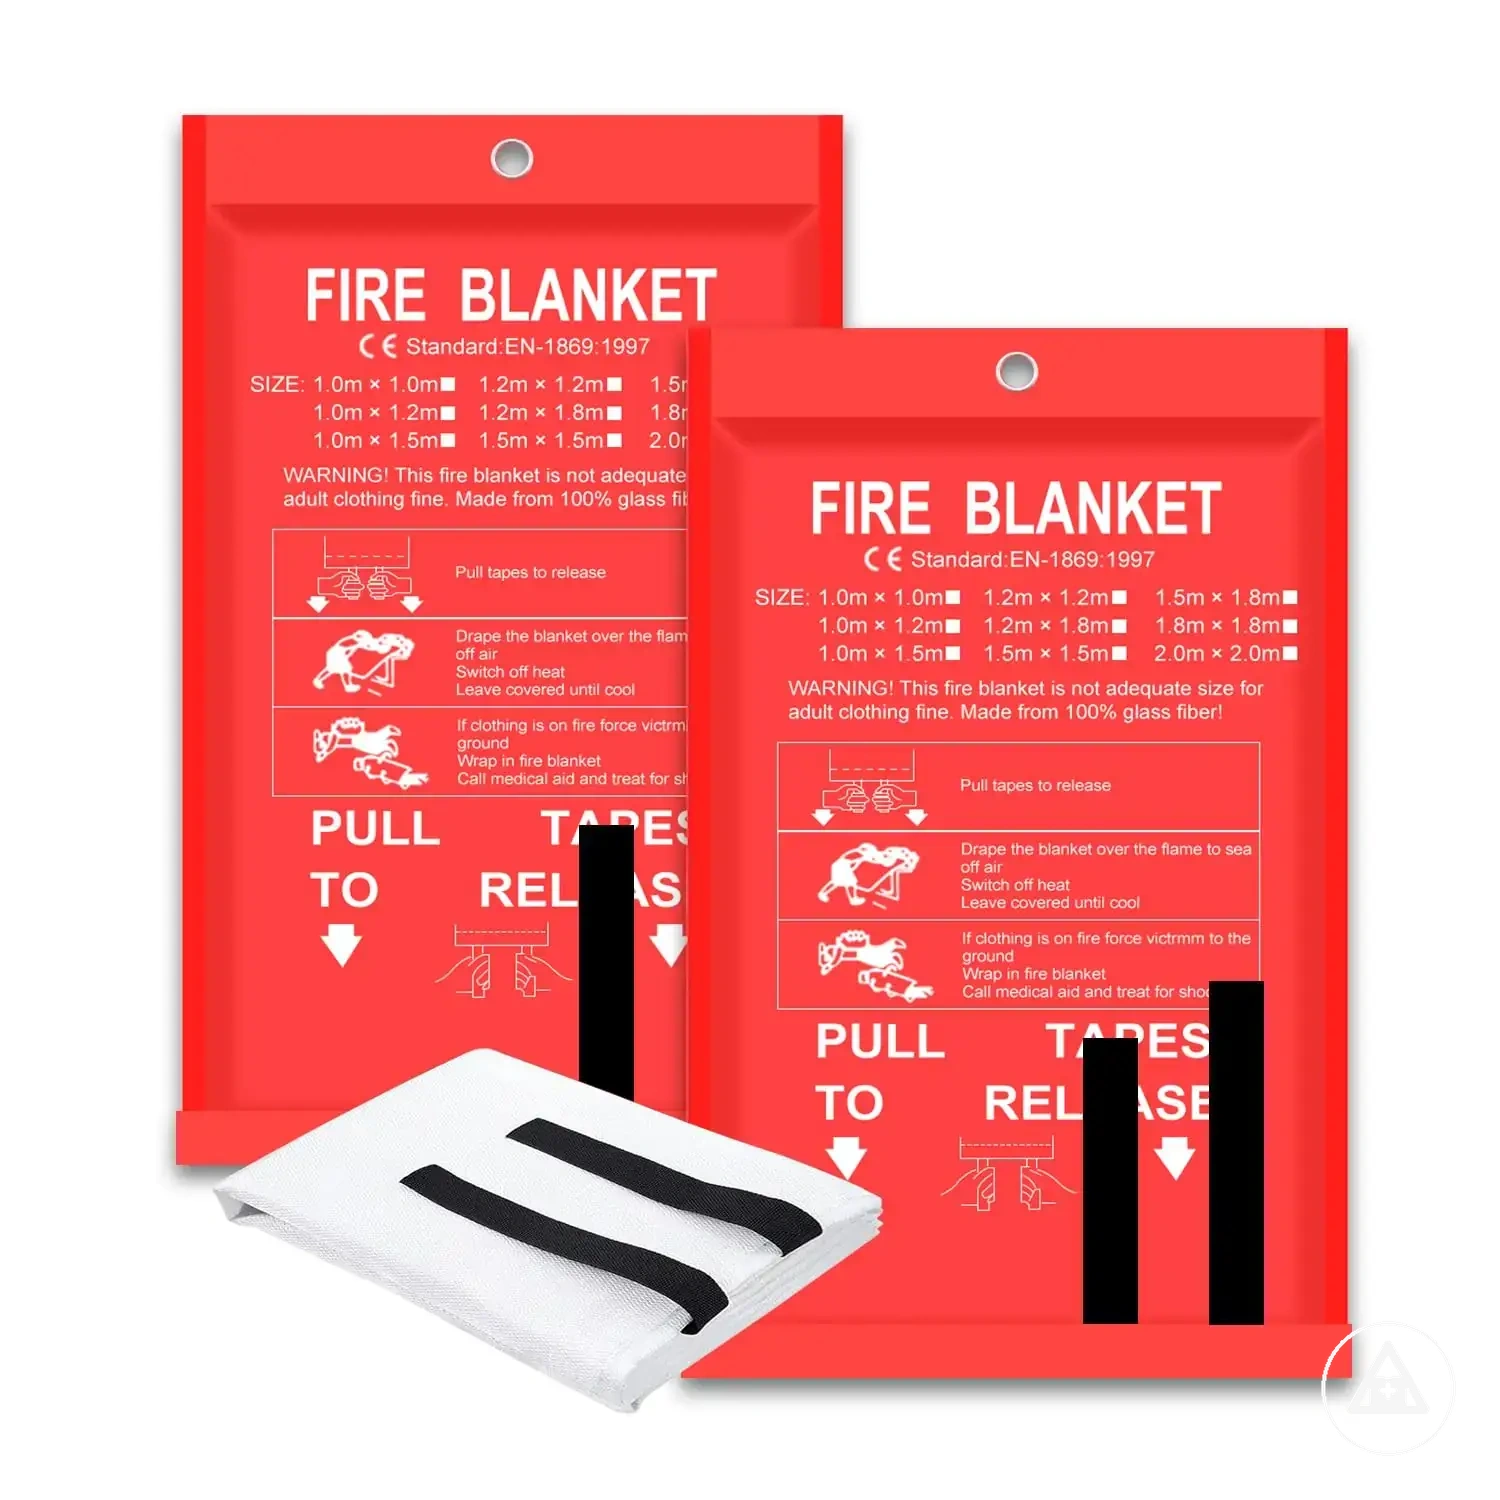
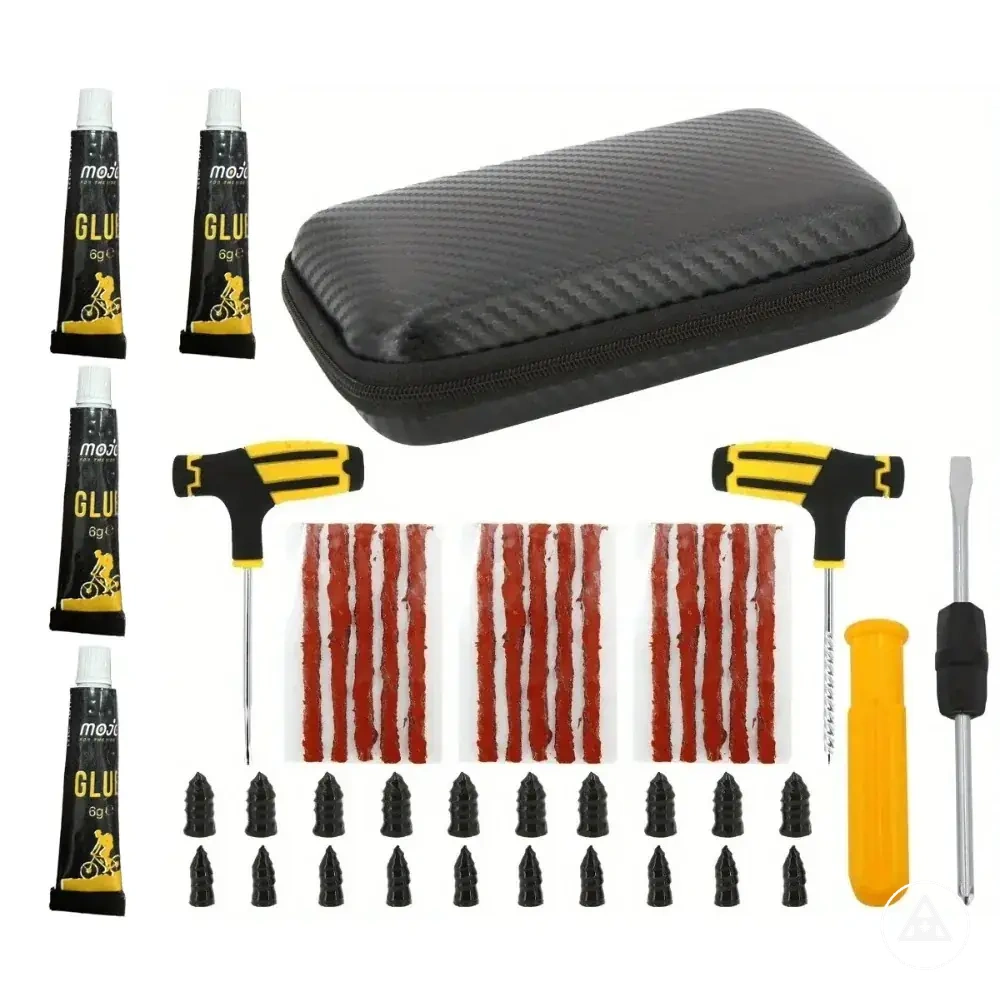
Roadside tools, blankets, and safety gear
Roadside tools, blankets, and safety gear can lose reliability when items become damaged, difficult to access, or affected by storage conditions. A physical inspection helps identify these issues before the equipment is needed. The goal is to maintain physical reliability.
Physical inspection verifies that durable items remain usable and accessible rather than merely present in the kit. Use the following checks to review condition and access:
- Reflective gear: Check reflective gear for visible damage, wear, or storage damage that may reduce usability.
- Blankets: Inspect blankets for tears, moisture, or signs of being wet for extended periods; replacement may be appropriate when condition affects usability.
- Gloves: Check gloves for holes, splitting, stiffness, or other visible damage that may reduce readiness.
- Warning items: Review warning items for missing parts, visible damage, and whether reflective elements remain visible and usable.
- Basic tools: Inspect roadside tools for cracked handles, missing components, corrosion, or other condition issues that may affect reliability.
- Bag access: Confirm that safety gear and roadside equipment remain easy to locate and reach, since limited accessibility can reduce readiness even when items are present.
How to Replace Expired, Used, or Missing Kit Items
Replace expired items, used items, damaged items, or missing items before the next meaningful drive to maintain kit readiness. Replacement decisions should follow item condition, packaging guidance, and inspection findings rather than a fixed schedule. The goal is a complete readiness outcome through replace-before-driving logic.
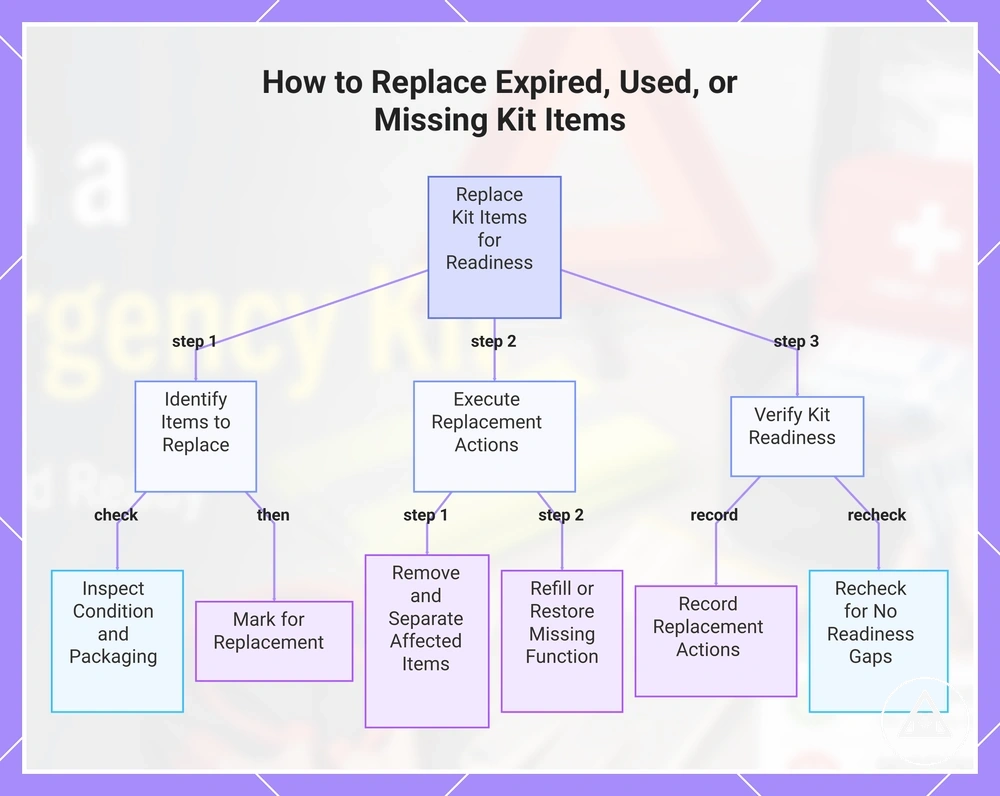
Replacement moves from inspection to refill and then to confirmation. Use the checklist for missing items when verifying whether a missing item needs to be restored.
- Identify items that are expired, used, damaged, or missing, and mark them for action when item condition no longer supports readiness.
- Remove affected items from the kit when expiry, damage, previous use, or absence creates a readiness gap; completion is reached when all affected items are separated for replacement.
- Replace, refill, replenish, or restore the affected items according to their condition and intended role; completion is reached when the missing function returns to the kit.
- Record what was replaced or refilled so future inspections can confirm kit completeness; completion is reached when replacement actions are documented.
- Recheck the kit to confirm that replacement, refill, and restoration actions have been completed; completion is reached when no identified readiness gaps remain.
For example, a used first aid supply or a flashlight with a battery that no longer functions becomes a replacement task during inspection. Labels, packaging condition, storage conditions, and current item condition should remain the primary cues when deciding whether to replace, refresh, or recheck an item.
This chart shows the three-stage process for replacing kit items: identify affected items, execute replacement actions, and verify readiness.
When to refill individual supplies
Refill individual supplies when only specific items are expired, used, missing, or damaged and the rest of the existing kit remains ready. A small refill can restore readiness without changing the overall kit setup. The key decision is whether the issue is limited to individual supplies that meet the refill condition.
Use the following criteria to decide when a refill is enough:
- Item condition: Refill when one individual supply is expired, used, missing, or damaged while other supplies remain usable.
- Quantity: Replenish or top up when the remaining quantity no longer supports the intended contents of the existing kit.
- Expiry label: Replace one item when its expiry label indicates attention is needed, even if surrounding supplies remain suitable.
- Existing kit fit: A refill should match the role and storage arrangement of the existing kit so the restored item integrates without creating new gaps.
- Urgency and duplicate risk: Refill promptly when a missing item affects readiness, but avoid adding unnecessary duplicates that increase storage without improving the readiness outcome.
When a full kit refresh makes more sense
A full kit refresh makes more sense when the kit is broadly incomplete, poorly stored, damaged, outdated, or no longer matches current vehicle use. Individual refills suit isolated gaps, but a broader refresh may be the clearer decision when multiple coverage gaps, repeated use, or storage failure affect readiness. The refresh threshold is reached when restoring many separate issues requires more effort than maintaining the existing setup.
The comparison below helps distinguish an item-level refill from a full kit refresh.
| Item-level refill | Full kit refresh |
|---|---|
| A few expired, used, missing, or damaged items need attention. | The kit is broadly incomplete with multiple missing groups or widespread condition issues. |
| The existing kit structure remains usable and organized. | A damaged kit, poorly stored supplies, or storage failure may reduce overall reliability. |
| Effort is limited to restoring specific items. | Many separate replacements may require more effort than resetting the kit. |
| The coverage gap is narrow and limited to a small number of items. | A larger coverage gap affects multiple supply groups and may justify a broader refresh. |
| The vehicle's use and driving needs remain largely unchanged. | A changed driving context or repeated use may make a full kit refresh the more practical decision. |
How to Keep Replacement Supplies Ready Without Overpacking
Replacement supplies help maintain kit readiness when commonly replaced items need support between inspections. The goal is to keep useful backup supplies available without making the vehicle storage area cluttered or confusing. Effective replacement-supply planning balances readiness versus clutter and reduces the risk of overpacking.
- Keep quantities limited to what may reasonably support the existing kit.
- Use labels to identify replacement items and reduce confusion during inspections.
- Review expiry information on first aid refills and other dated supplies.
- Store spare batteries and emergency blanket replacement items only when they fit within storage limits.
- Control duplicates so replacement supplies do not accumulate without a clear purpose.
Replacement supplies work best when quantities, labels, and storage limits are managed together. Spare batteries, first aid refills, and emergency blanket replacement items can remain ready when clearly identified and kept separate from regularly used supplies. Appropriate quantities depend on available vehicle space, item type, and potential expiry risk. This approach helps keep backup supplies controlled rather than expanding into unnecessary extras.
Replacement-supply planning should support the existing kit rather than create a second unmanaged kit. Unmanaged duplicates can create clutter and make inspections less clear, while controlled replacement items remain easier to review and maintain. The practical decision is to keep only the backup supplies that support readiness without contributing to overpacking.
The products below are useful examples for comparing available options. Before buying, check that the compatibility criteria, key features, and product details match your needs.
This chart outlines the three key actions for managing replacement supplies: limiting quantities, labeling items, and controlling storage and expiry.
Storage Conditions That Affect Emergency Kit Readiness
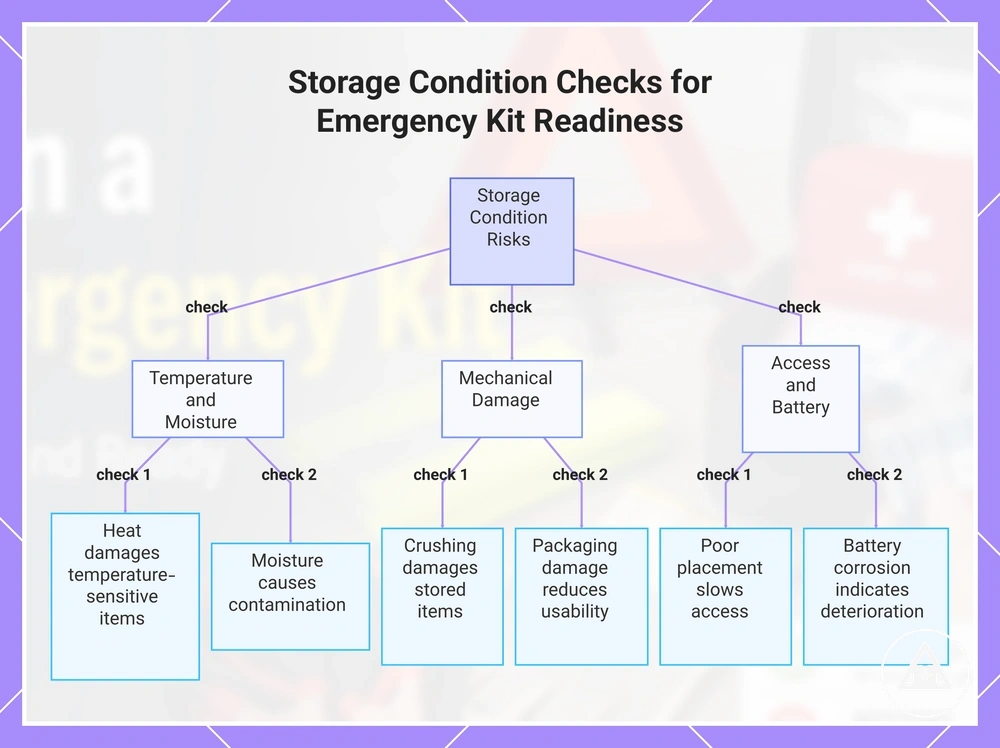
Storage conditions can shorten the useful life of emergency kit items or make them harder to access when needed. Heat, moisture, crushing, and poor placement may affect item condition, packaging integrity, or usability over time. Managing these factors helps reduce maintenance risk and supports overall readiness by limiting storage risk.
- Check for heat exposure that may affect consumables, packaging, or other temperature-sensitive items.
- Inspect for moisture and water exposure that may contribute to contamination, deterioration, or reduced reliability.
- Look for crushing that can damage stored items or cause packaging damage.
- Review battery-powered items for signs of battery corrosion and related condition issues.
- Confirm that poor placement has not reduced access speed when the kit needs to be reached quickly.
- Inspect packaging condition regularly and replace items when packaging damage creates uncertainty about usability.
Storage environment conditions influence how well emergency supplies remain ready between inspections. Heat, moisture, packaging damage, and battery corrosion are condition variables that can affect item reliability and may increase replacement needs when deterioration becomes visible. Access speed is also part of readiness because poor placement can make otherwise usable supplies harder to reach.
This section focuses on maintenance risk rather than detailed placement strategy. For broader guidance on where to keep the kit, refer to the dedicated storage guidance page. The maintenance objective is to identify storage-related conditions that may reduce reliability or slow access speed before they affect readiness.
This chart shows the key storage conditions to check for emergency kit readiness, covering environmental exposures, mechanical damage, and access-related issues.
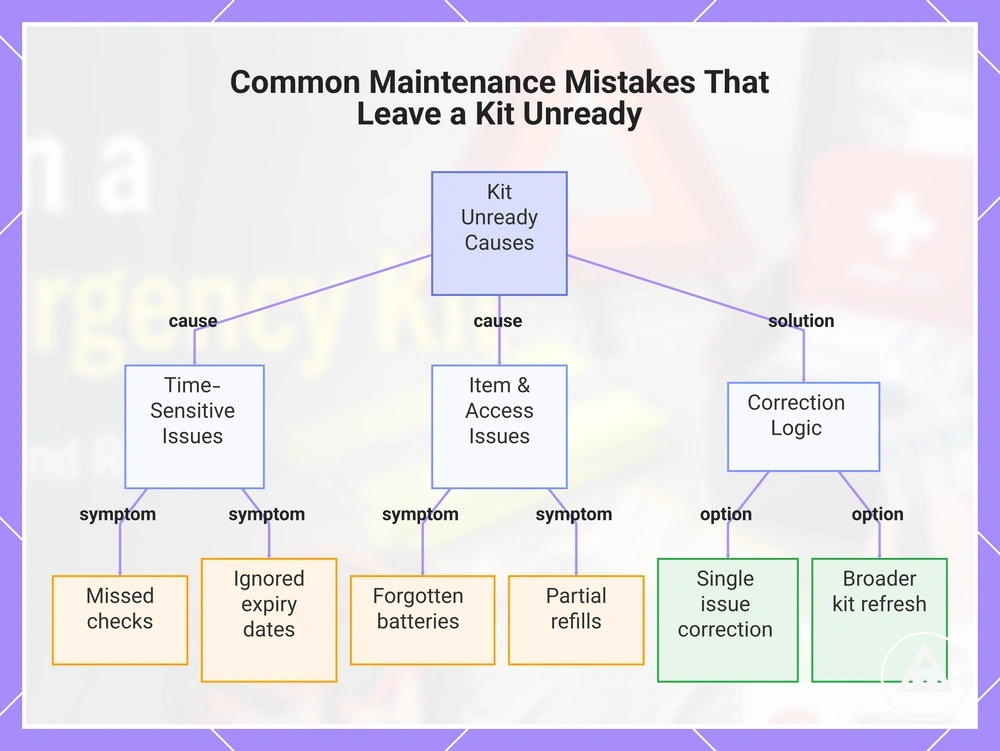
Common Maintenance Mistakes That Leave a Kit Unready
When a kit is unready, missed checks, ignored expiry dates, inaccessible storage, or partial refills are often part of the cause. These maintenance mistakes create readiness gaps that may remain unnoticed until supplies are needed. Identifying failure patterns early helps focus correction efforts where they have the greatest impact.
The troubleshooting list below organizes each maintenance mistake by its likely effect and a preventive correction.
- Missed checks: Expired supplies can remain in the kit unnoticed. Correction: Review kit condition on a consistent schedule to identify readiness gaps.
- Ignored expiry dates: Expired first aid supplies may remain stored beyond their intended use period. Correction: Include date-based items in routine maintenance reviews.
- Forgotten batteries: Battery-powered items may be unavailable when needed. Correction: Check battery condition and function during maintenance checks.
- Partial refills: Missing items can remain absent after previous use. Correction: Use a checklist to restore missing items after replenishment.
- Damaged packaging: Item condition may become harder to verify. Correction: Review packaging condition and address supplies affected by visible damage.
- Inaccessible storage, overpacked bags, or seasonal neglect: Access delays and overlooked condition changes can reduce readiness. Correction: Review storage access and kit condition when circumstances change.
Correction logic depends on the scope of the readiness failure. A single issue, such as forgotten batteries or a small number of missing items, can often be resolved through a targeted correction. Repeated maintenance mistakes, ongoing partial refills, or multiple readiness failures may indicate a broader pattern that deserves closer attention.
A simple correction is usually sufficient when the issue is isolated and the overall kit remains in good condition. A broader kit refresh may be the safer option when inaccessible storage, damaged packaging, seasonal neglect, or multiple unresolved readiness failures affect the kit at the same time. The appropriate response depends on item condition, the amount missing, and storage history.
The products below are useful examples for comparing available options. Before buying, check that the compatibility criteria, key features, and product details match your needs.
This chart identifies the primary maintenance mistakes that cause a kit to be unready and explains how to choose between a targeted correction and a broader refresh.